
- When it comes to preserving the genetics of cannabis plants, pollination is key to any grower.
- Thanks to this natural process for cannabis you can gather new seeds of the strains you like most in a relatively short time period.
- In this post we explain to you the steps to sustain, in a simple way, the properties of your cannabis crop.
Anyone who starts out growing cannabis should know that there are two ways of going about planting: with seeds acquired from banks of cannabis genetics, like Dinafem; or from cuttings, that is, fragments removed from a mother plant for a reproductive purpose, to replicate its features.
In this way, plants have two forms of reproduction: one asexual, corresponding to cuttings, layering or grafting; and another sexual, characteristic of seeds and based on pollination. It is, precisely, pollination that we are going to stop and look at, as it is a way to sustain, or even improve, the genetics of cannabis plants. Many are actually familiar with it by accident, much to their chagrin.
What happens is that growing conventional cannabis tends to eliminate all the males as soon as they display their sexual characteristics, which means that females do not pollinate, essentially remaining virgins, so that they put all their energy into the production of resin, instead of seeds. The result is a cannabis that has traditionally been called "seedless," one much more potent than that offered by pollinated marijuana.
Step 1: Identification of males and females
To begin the pollination process, first we first need plants of different genders; that is, male plants, responsible for producing pollen, and female plants, recipients of this pollen and producers of seeds.
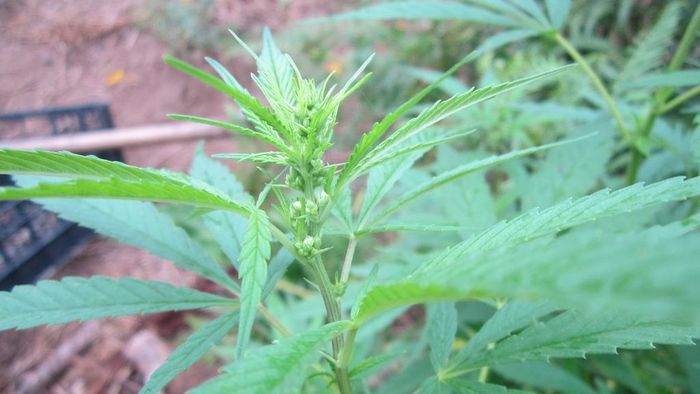
Growers can determine a plant's gender when it reaches its pre-flowering period, which occurs between the fourth and sixth week of growth. Far from needing any magnifying glasses, microscopes or extensive botanical knowledge, one simply needs to pay a little attention and look at the stems of the newest leaves. More specifically, in the area where they join the main stem.
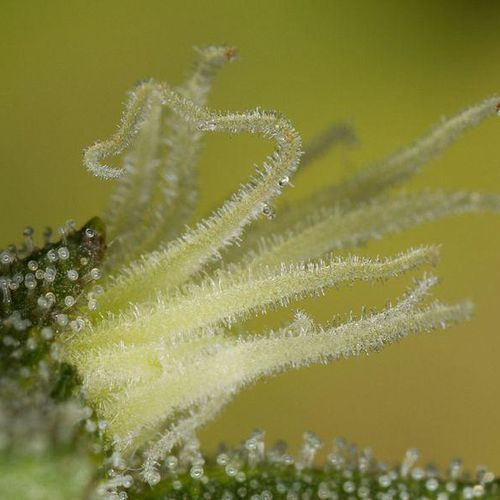
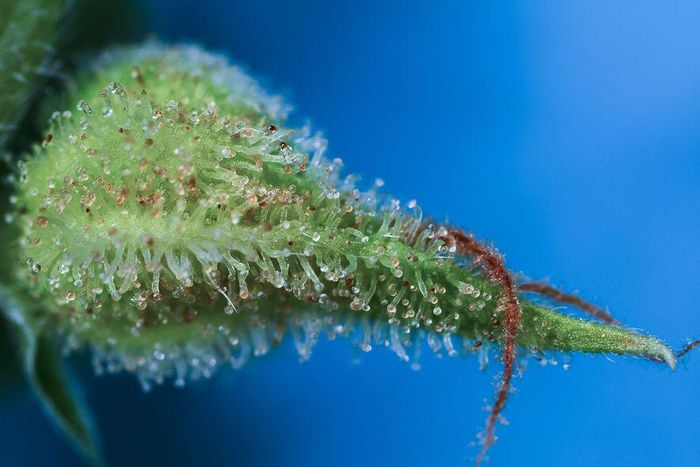
In these parts, female plants develop "pre-flowers" that resemble a pear-shaped ball, from which grow two small hairs, usually white, commonly called pistils (though, actually, the pistil is the whole set of the stigma, calyx and ovary). They develop in a V shape, and in later stages group up, forming our precious buds. If you cannot locate them, don't panic. This just means that your plant has not yet reached sexual maturity, so you'll have to wait a few more weeks to determine its gender.
If you have a male plant, you will find the same little ball, but without the white hairs. Instead, it develops kinds of little bags, whose function is to later contain the pollen. Among other differences males feature, distinguishing them from females, is that they are usually taller, their branches are more irregular, and they have fewer leaves and internodes.
Once you have discerned the sexes, the next step is to select the most appropriate plants to carry out the fertilisation.
Step 2: Selection of the best plants
If this is the first time you are pollinating cannabis plants, it is best to avoid experiments. That is, don't try to create a new strain, or mix them, as this requires painstaking work more appropriate for specialised genetic banks and veteran growers. If you try to, your combination could be successful, but it also may might be a real flop, and you could waste a whole crop by creating genetics that are highly unstable. To avoid an unnecessary fiasco, at least until you get the hang of pollinating cannabis, it is best to select males of the same genetic as your females.
This does not mean that those chosen to pollinate will be the largest plants. Rather, the selection of both males and females will depend on their capacity to adapt to their growing environment, those that are the most vigorous and productive. For example, those that have adapted best, suffered least, are the most potent, have developed the most, and required the least nourishment. Details should also be sought in the plant's structure; for example, those that present short distances between nodes, and other traits important to growers, such as their smell, taste, and resistance to mould and pollutants. Once the selection has been completed, separate the males in a different and sealed space or cabinet in order to prevent any type of pollen contamination.
One must remember that the male contributes about 25% of the plant's final genetic material. Hence, until the crossing is carried out the grower will not know the final composition of his seeds. But what one always looks for, in order to get as many as possible, is a strong male with lots of flowers at the tip, and buds presenting dense pollen, as the prime objective is for a single male to be able to impregnate the greatest possible number of female plants.
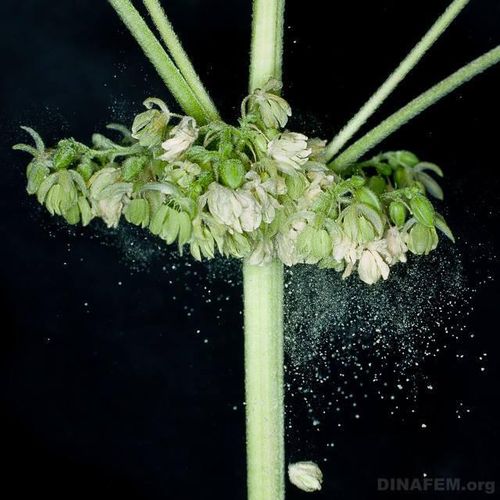
Step 3: Obtaining pollen
As a reference point, from the point at which the male begins to flower until its first flowers open, releasing pollen, some two to three weeks transpire. In just 10 days, however, one can begin to see those "little eggs" (which are nothing but male flowers), while the first stigma of the female plant also come into view.
The development of the male's flowers is progressive. First the flowers gradually turn yellow, changing from their original green colour. When the first male flowers begin to indicate that they are about to open, it is a good idea to turn off the fans in your grow room, while maintaining the air circulation, to keep the humidity from rising. Moving air can lead to the loss of pollen from the first flowers that open. About 10 days later most of the male plant flowers have yellowed, and then you'll have to reduce your watering, without drying the plant, but without excess water either, as moisture helps flowers open faster.
When the male plant is mature, the flowers open their sepals, exposing the stamens and releasing pollen into the air. This is when you should proceed to pollinate, because if you wait three or four days the pollen can significantly lose its fertility. Remember that when the moisture level exceeds 75% the pollen starts to die quickly, so it is best to keep it as dehydrated as possible.
Step 4: Cutting the male flowers
Pollination can be done by cutting parts of the male plant at the peak of their maturity, or using the whole plant to spread the pollen on the female plants. If you choose to cut it, to handle it better and carry out a more controlled pollination, you must take into account a number of conditions. Don't overdo it with the scissors: just cutting some flowers will be enough to produce hundreds of seeds.
With tweezers, select the most mature flowers (which will present a more intense yellow colour) and leave them one or two days in a glass bowl or plate, in order to let the pollen dehydrate. Another option is to hang the flower upside down and let the pollen fall into a container, if you don't want your table spattered with yellow powder. After that, tap the flowers gently with tweezers so that the rest of the pollen falls and the stamens are devoid of powder.
Step 5: Conserving the pollen
To maintain the properties of the pollen every grower has his own tricks, but all are based on achieving the maximum dehydration of these particles. Conserving them calls for controlling the humidity and temperature, as these variations can damage their reproductive qualities.
Also, if you have acquired a generous amount of yellow powder, you can also store it in the freezer in order to carry out future pollinations. Yes, pollen can be frozen, and stored for months. To do this you just need to use a good jar, and keep it from getting damp when you take it out of the cold. One way is to leave the jar at room temperature a few hours before opening it. This is important, because if the pollen comes into contact with moisture, the whole process will be ruined.
Step 6: All ready to pollinate in a controlled manner!
Females are ready to be pollinated after their early flowering stage, and when they have developed large heaps of flowers forming buds of a decent size. The best time to pollinate the female is when the flowers have fully-formed stigmas (the little white hairs), as long as possible, usually four or five weeks after the beginning of flowering, or 25 to 35 days, always depending on each strain. There are even strains that can be pollinated 20 days after flowering has begun.
But remember that the times for male and female are different, because the male flowers before the female does: as a general rule male plants tend to mature about two weeks earlier than females. With this temporal divergence, day 30 of flowering to pollinate the female is day 45 for the male, which is how long it takes to have the greatest amount of pollen: the more pollen the male has, the more likely it is to pollinate the female, and the greater the final number of seeds.
The application of the pollen is very simple: if you have cut flowers and saved the pollen, with the help of a brush, a cotton ball, or even your fingers, sprinkle it on the feminised plant. Do this repeatedly for two or three days.
In this regard, it is important that the pollen not reach the buds of the lower parts of the plant, or its willowy parts. Nor is it advisable to pollinate complete buds, but rather the parts that retain the white, most receptive stigmas. It is also useful to prune all the flowers that have not been pollinated, as in this way the energy is concentrated on the buds that really matter to you, and the plant does not waste resources on parts you are not going to use. In this "artisanal" way, for low volumes, you will obtain several hundred seeds without any problem.
Step 7: What if I want a lot more seeds?
You must remember that there is nothing better than fresh pollen taken straight out of male flowers. So, another form of pollination is to directly grab a male plant and shake it on the females. You can use a small stick to tap the branches of the male so that its pollen falls on the buds and produces fertilisation with the help of gravity.
It is important to turn on your fans before shaking the plant so that the pollen goes everywhere before falling to the floor. The temperature of the room where pollination occurs should be 24° C, with humidity no greater than 65%, as the hotter it is, the less oxygen per cubic meter of air, allowing the specks of pollen to remain suspended in the air longer.
The pollen, once it touches the stigmas of the female plant, still takes 3 to 5 days to reach the calyx and the ovary, and for fertilisation to occur. So, once you have carried out the first pollination, return the female plant to its place, irrigate it after 3 or 4 days, and pollinate it again, just in case. As what we are after is the greatest pollination possible, some growers finish the process by shaking the females too at the end so that all the pollen that has stuck to the leaves can reach the buds below. In this way thousands of seeds can be obtained per plant, rather than the hundreds of seeds achieved manually.
Step 8: Harvesting seeds
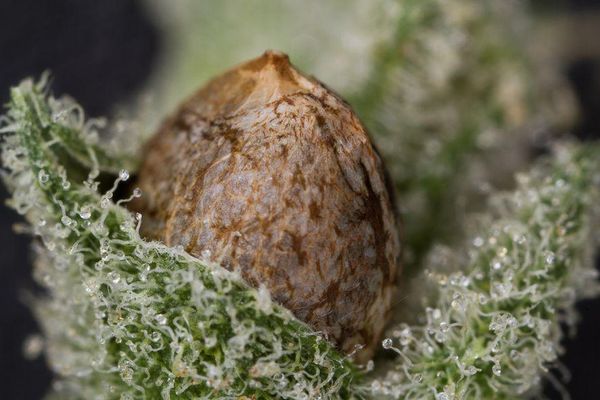
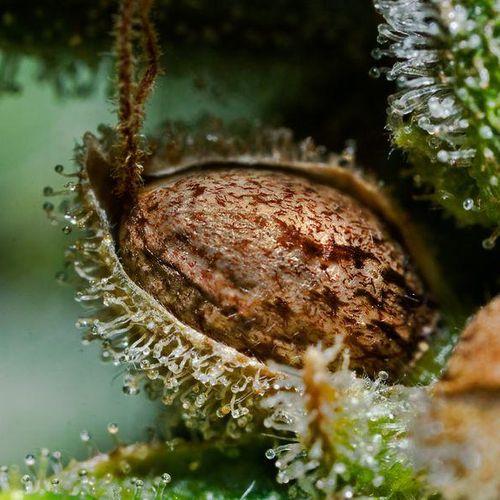
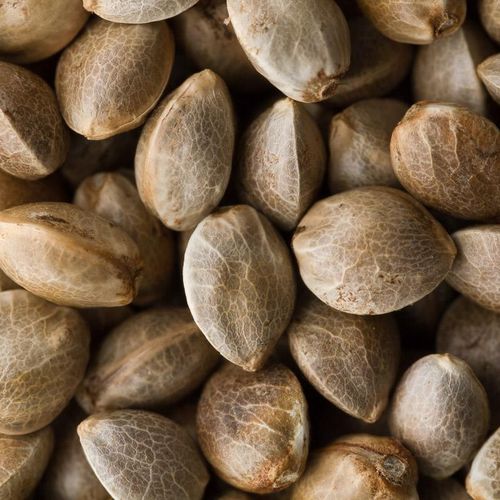
If the process has been carried out properly, in just a few days you will see the seeds begin to grow inside the calyx of the female flowers. Once the plants have been pollinated, most of the seeds will take 4-6 weeks to fully mature (always depending on the strain). At the end of flowering period they will be ready to be harvested, so that you can enjoy another pleasant cannabis harvest. This is just when the seeds begin to darken, going from green to brown or dark grey, and the calyces begin to open so they can easily get out.
You can test the seeds to determine whether they are mature, and how hard their hard shell is, by taking one and pinching it between your fingers to see if it breaks. Seeds with stripes and other patterns are usually a good indicator that they are mature, but remember that not all strains produce stripes on their seeds. And bear in mind that the seeds of different genetics can be of different sizes: some strains can offer you seeds that are smaller than normal, and this could be misinterpreted as a sign of immaturity.
And, as always, remember that one of the basic rules is to use sterilised tools, and keep good records on the dates and details of the strains you have decided to work with. With these simple tips, you can now get down to work and start pollinating your cannabis plants.
Comments from our readers
Read comments in other languages:
Did you like this post?
Your opinion about our seeds is very important to us and can help other users a lot (your email address won't be made public).